Sunday 18 November 2012

The Salad Dodger is done, an EPS core with glass under and over veneer, 16 oz over the rails with 3 stringer core, the tail block is made up of strips of Western Red Cedar and Paulonia, the deck pad is a 6mm D cell foam that has been laminated to the deck under vacuum pressure, it should provide some degree of strength to the board in the high traffic areas, the whole thing weighs in at 23lbs. The acrylic black paint works OK with the UV protection clear layer which is a high grade yacht varnish. Its been a great build using Welsh recyclable EPS and Welsh Birch veneer, the resin used is Resin Research Epoxy a really good clear resin and a good performer in my book! Fins boxes are FCS and the huge 'D' fins in the photo are made by laminating 2 x 4mm marine ply and 1 x 3mm marine ply, a simple 4oz cloth layer and a hot coat followed by clear coat and they are done. Sorry for the watering can on its side!!!!


Monday 12 November 2012

EPS egg project..


An EPS replica of Huw's spendid Egg, with Huw's kind permission I have used his template to cut and shape two boards, a single stringer EPS and a peripheral stringer EPS, these will be super light clones and tested along side the hollow woodie. The stringer model will hopefully weigh in just under 6lbs with the peripheral rail stringer board with Balsa rails deck and bottom about 5lbs. Lets get mowing!!!!!

Got the Salad Dodger in paint, experimenting with acrylic over glass, not great but gets the job done, it will be colour in the resin next time.... Clear coat going on tomorrow followed soon after with the deck pad ...happy days.

Wednesday 7 November 2012

The Salad Dodger


The first in the line of EPS cored Stand up paddle boards, outline and aspect ratio is very Simmons, just an enlargement of what I have been working on the last year. The development of this board has been geared towards a home kit build or assisted build at my workshop. It has 3 stringers and a wood veneer deck and bottom if preferred, with painted, etched, airbrushed or clear rails. The veneer is providing a problem especially without the vacuum bag which lends it more to an assisted build but I'm working on that, so here are the pics, volume approx 170 lts and 8 ft long, its huge, comes in at 22lbs so not a huge drag to the water!!!

Tuesday 6 November 2012

Stitch and glue Sea kayak, sleek and fast

After a long spell of busy, which is always good I thought I would post up about some of the stitch and glue Kayaks that we have been working on, just finished the design and half way through the first build of a new 12 foot single kayak, its an old school hull shape with a wide and easy cockpit coaming, designed to be really stable in the water, ideal for a first time paddler or fisherman, pics coming soon so here are some a Sea kayak finished last year with the same build technique.Sleek and fast....cheers all


Friday 31 August 2012


The last of the batch of hand planes finished, need some tidy swell now to test this one, had a great time at Croyde with em....

Saturday 11 August 2012

Well, its been a while, lots of development work going on with resins, glues and vacuum bags,Beech veneers are being prepared and EPS sourced, all within Wales! The all Welsh composite is not far away! Here is one of the experiments in pre-preg EPS and which turned out to be the best fun in the poor surf conditions at Croyde last week, not quite Frank Malloy, just fun.

Monday 21 May 2012


Got to paddle the board yesterday, great fun although a little twitchy. Bring on some waves, when my back gets better!!!!!!!!

Thursday 17 May 2012

Spun the beast over today and varnished the bottom, sounds rude!!!! Good to see it all coming together, may even go for a trail paddle this coming weekend if it all goes well.....cheers all

Tuesday 15 May 2012

Glassing done and sanded, its the first time I have had the chance to sand rails with a belt sander, they are huge!!! I normally end up with my preferred skinny rails. The pics show the first coat of Epifanes clear yacht varnish with a slant on the Blame Laird sub culture!!!!!

Thursday 10 May 2012

Final shaping and snagging

Final sanding, the best bit, its all been glued together and all the bits that didn't look like a surfboard planned off!!!! Hand carry slot and fin plugs done, glass the rails and gloss coat...done, well, by next weekend hopefully!!

Monday 7 May 2012

Plugs and funky tail


Got the FCS plug seats cut today and funked up the tail, decided to go for an elliptical tail, not that it brings anything to the party, it was just suggested by a friend so try it and see if it works I reckon! The carry hand slot and leash plug tomorrow, build up the tail, 2 layers of glass on the rails and get it wet!!

Thursday 3 May 2012

Glass and foam


Glassing is ongoing in between the cold weather periods, should have pics of four fresh glassed boards soon, to fill the downtime void I dug out my vacuum pump and bag and got creative with carbon and lateral stringers with 1lbs EPS, great fun to mow foam again and got loads of ideas for some hybrid recycled foam/pvc SUPs and surfboards, love the research and development side of things and getting to try out all the stuff that spins around your mind just before you fall asleep, here are some pics of an 8' 4" fishy SUP board that has all those ideas in there somewhere, its huge volume should be enough for the whole family, just some R+D fun.The top pics showing the 3mm marine ply and 4oz lam top and bottom, then onto the EPS and into the bag, get a pull on for 7 hours, lay up the corecork rails and back in the bag for an hour, two more rail lams and should be done!!!...cheers all.

Monday 16 April 2012


Been ages since my last post, been busy with carbon stringers and parabolic rail infusions, interesting stuff with lots of experimentation, most of it went tits up but I learned a lot...more on that in later posts... Finally sanded the Mini Simmons Christmas tree, fin plugs tomorrow and glass by the weekend...hopefully!!!!!

Friday 16 March 2012

The board survived the handsaw, it's always a scary moment cutting great chunks off the nose and tail, then comes the pain, plenty of sanding to the pencil line with a wide sanding board and 80 grit paper. When the surfaces are flat and clean of dust the nose blocks are coated with a mixture of Epoxy resin, Cabosil and wood flour, looks just like peanut butter!

     The nose block gets the same treatment then sanded into shape when fully cured, the photos show the nose and tail blocks rough sanded to shape....time to start on the final sanding of the rails, trying to get a smooth tucked under edge and blend it into the rest of the rail......mainly sanding then!!!!!!!

Friday 9 March 2012

Board is out of traction!!! The lost 1/4 of an inch of nose rocker has been recovered so trimming up of the deck can begin, this can be done carefully with a short blade jig saw or very carefully with a router!!! My block planes have been sharpened to within an inch of their lives so I have been using those, besides the sound of a sharp plane taking shavings is fab. After the deck is trimmed I will cut and sand the nose to take the nose blocks with the same at the tail....cheers all.

Wednesday 7 March 2012

The deck is on, the resin and glue will take a couple of days to fully cure but the Christmas tree deck is in place.... Again as you can see there can be no such thing as to many clamps or bricks.... the sandbag near the nose is there to provide the weight required to recover the lost quarter of an inch on the nose rocker..

  when its all cured I will cut in the nose blocks and glue up the tail block...cheers ..more soon.

Monday 5 March 2012

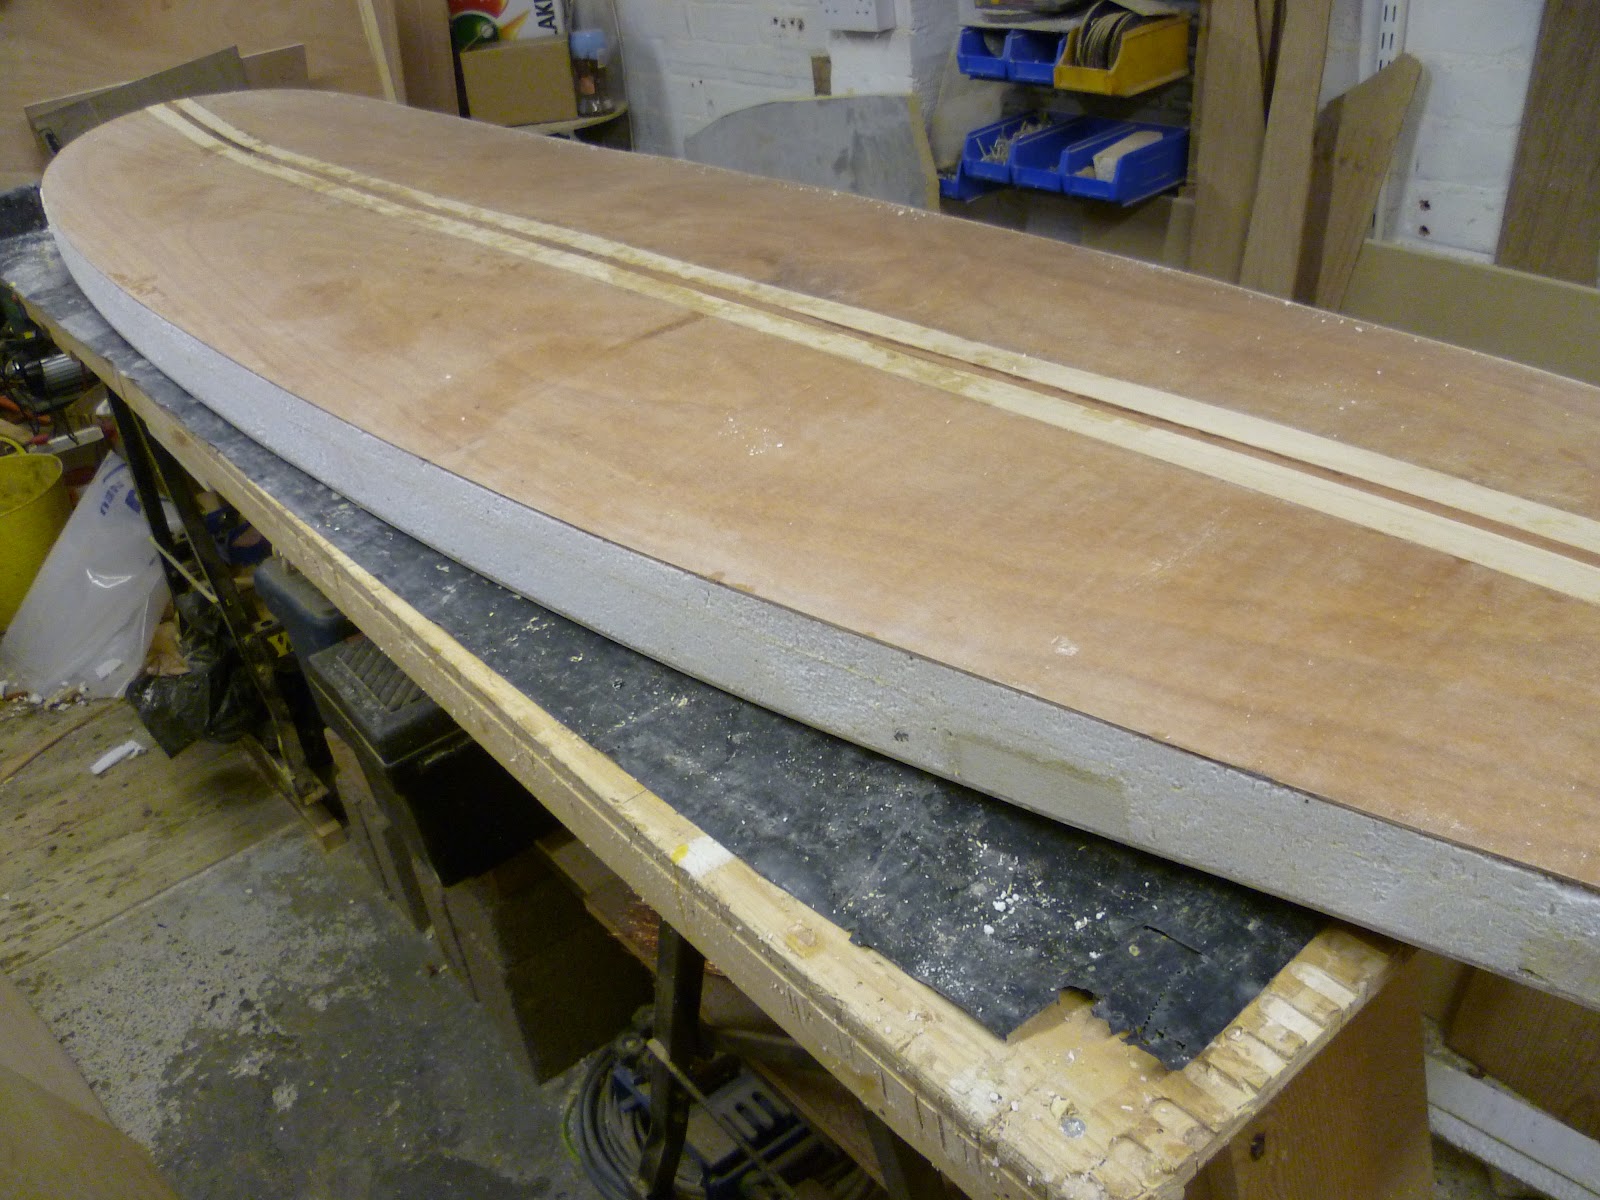
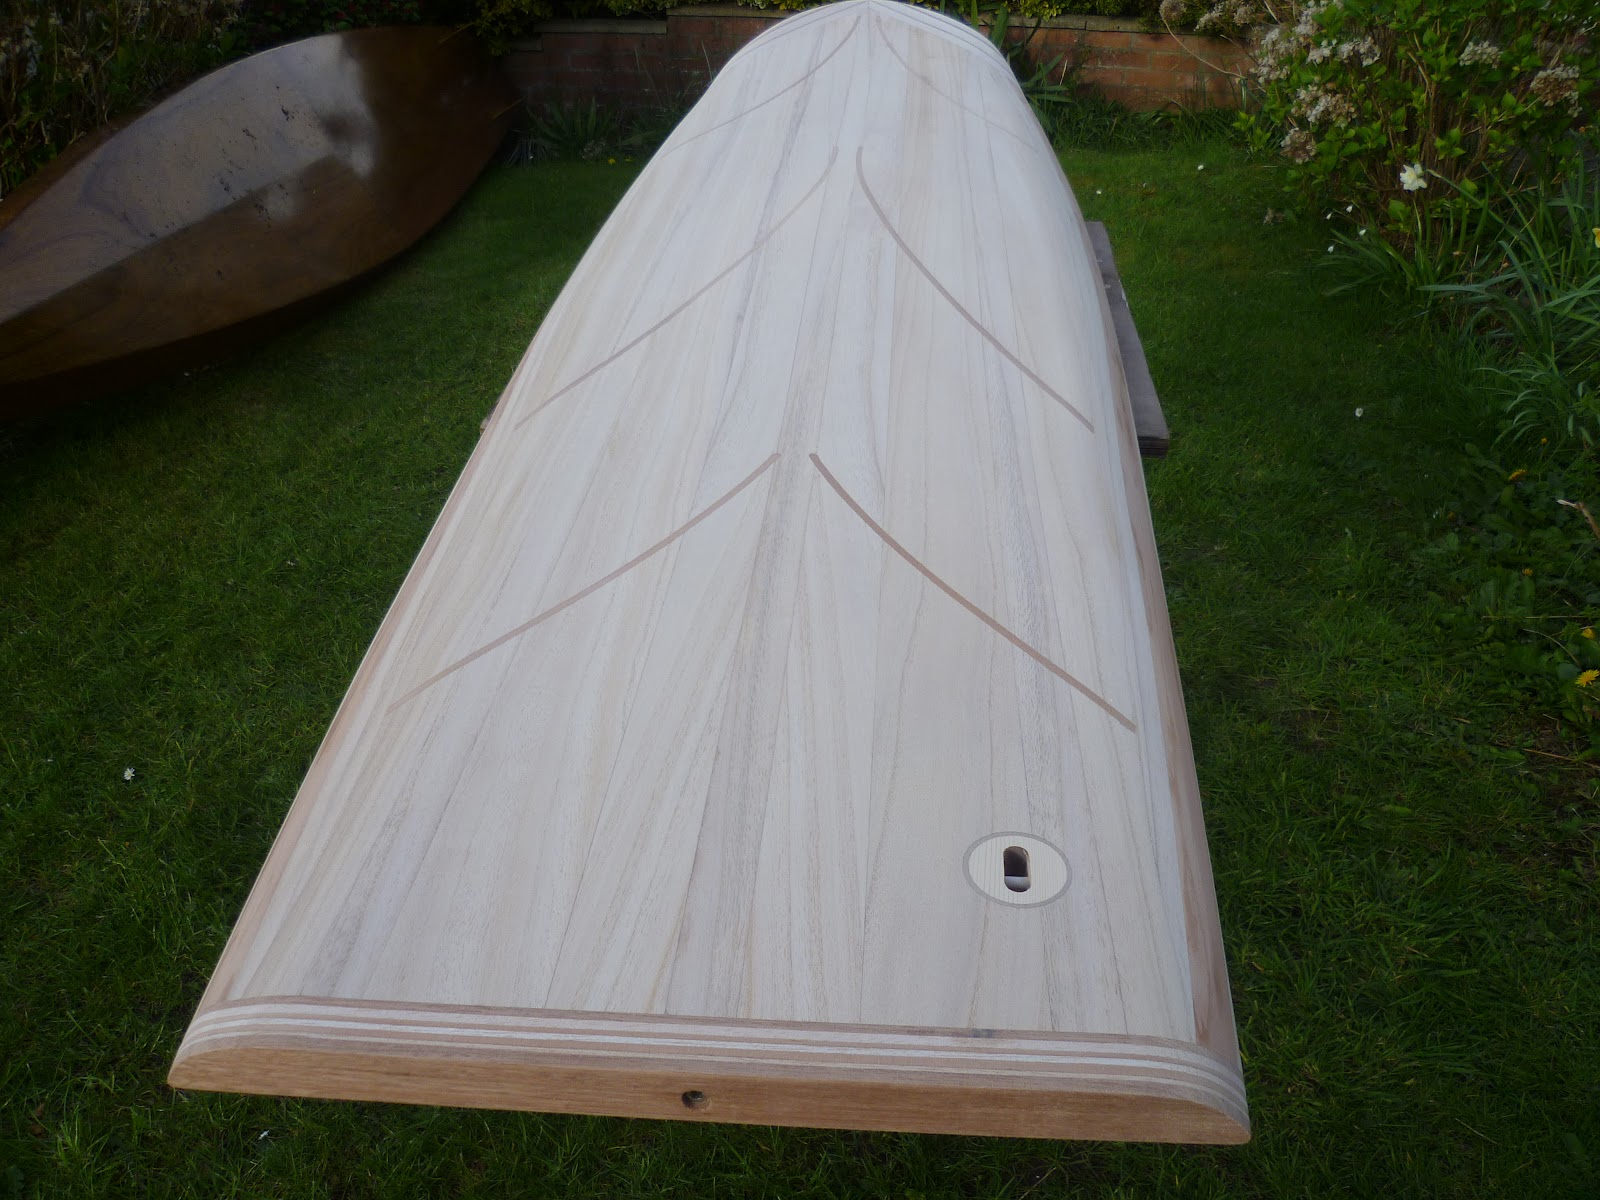
Got all funky with a Paipo template and the router this weekend on the deck of the Simmons.......more on that cock up later!!!!! The surfboard hull is now all cleaned out and the rails are planned flat to the ribs and abraded with 80 grit paper ready to take the thickened epoxy and then the deck panel, aaaaahhhh the deck panel. As I mentioned earlier the router work with the Paipo template took place and although it all went according to plan my artistic flair, or lack of it, ended in a deck that looks like a fecking Christmas tree, and no, I will not be putting any baubles on it Gazzy!!!! It has been decided that the deck will pay homage to the mighty Red Cedar, that's my story and I'm sticking to it!!!


   All that said the deck should be on in the next couple of days, this will done in the simple jig on the photo, this will recover the correct nose rocker which tends to relax a little when taken off the jig after the rails were done. Thickened epoxy is spread over the ribs and rails then the deck placed on and lightly clamped and weighted, give it a couple of days then take it out....cool......apart from the deck!!!!!

Thursday 1 March 2012

Aaaaaaaahhh, finding build time has been tough in the last couple of days, the board will be ready to take the deck as soon as I clean it out and break of the snotty bits of glue that are hanging around, if you don't you can bet one will become loose and give you a 7 foot rattle!!!!!!! In the meantime I have glued up the nose and tail blocks, the tail block is the one being assaulted with clips and clamps, not much to see I'm afraid, just trying to keep the blog continuity going.......cheers all.

Saturday 25 February 2012


The rails are all now glued up and have been planned flat to the top of the ribs, the rails are planned in such a way as they follow the contour of the ribs, continuing the dome of the deck if that is thier shape, as in this build. The stance supports are being finished and some packing will be added to the rear of the board to glue the tail block on to, these will be in Balsa. Started work on the deck today, Paulonia strips have been laid out and sash cramps used to squeeze them up, gaffer tape works well at holding them in place after the cramps are off. They can be 'hinged apart' to add the glue or resin and then when flattened out the excess can be removed, allow the deck to dry, sand it up and then get it on the board...cool.

Tuesday 21 February 2012


The rail build continues, the strips are added and follow the rib contour, this may need to be adjusted due to the square (ish) section of the strips, if the strip looks like it is sitting proud of the preceeding rail then adjust the concerned ribs ( usually the ribs in the centre of the board ) with a craft knife, dry fit the rail for fit then glue and clamp. In this build there are seven rail strips per side, the last two are Cedar, for no particular reason, I just happened to have them handy, these rail strips are almost completely sunk into the ribs, again this can be achieved with the craft knife, the fifth rail strip will be planed so as to form a platform with the two Cedar strips for the deck to sit on, so when planning or sanding these it is important that they follow the top profile of the ribs, if the ribs have no dome and are flat then the rail strips will be planed flat to take the deck,but who wants a flat deck eh!

Sunday 19 February 2012


With the Chines in place the rail strips can be added, the strip edge profile can be adjusted with a block plane, fit the strips in place dry and check them for fit and adjust as in the photo. The first two strips are Western red Cedar, they are just over a 1/4 inch think and 3/8 tall, then three or four more in Paulonia then a couple more Cedar to seat the deck, the reason for the Cedar is aesthetic, I plan to add some Meranti strips to the deck so wanted a little red in the rails. The photos show a rail strip that has planed to seat on the Chine. A bead of glue on the rail strip and a dab on each rib is all thats required then clamp it up. I tend to use large crocodile style clamps, these I found at Wickes and have detachable feet, I found they have an ability to clamp at many angles due to thier design. They are about a fiver a pair but work well, better than the split pvc pipe option allbeit more expensive, a rail containing seven strips can be done in a few hours...drink plenty of tea in between fitting, I am sure it makes the glue set faster!

Saturday 18 February 2012


The spar and ribs are now glued and the rocker is now stable. The next step is to glue in the chine strip, see photo. This will be glued touching the end of ribs and as far around the nose shape as possible, see pencil outline, this is easier to do in Cedar as it steam bends really well, a damp rag and the Iron set at melting point and off you go! The only downside is using this with moisture cure glue is it might get a bit messy! The chine strip can be quite thick where you might need it, for example, if you would like 50/50 rails the strip can be tall in the centre and thin at the nose and tail. (The chine strip is 3/4 inch Paulonia with a 45 degree angle cut in for the next strip to rest in)  a couple of passes with the hand plane can get the job done. The strips in the nose finish short as a retro style nose block are going to be fitted. Glue it up and get the kettle on, in a couple of hours the rail strips will be done, seven per side.....tomorrow for some more pics and chat...